

Headed to the Rockery
We have to go around the curve and down.
We have to go around the curve and down.
There used to be a downhill footpath into the dell. About
half way down and on the right-hand side there is a stone outcrop, a reminder, this used to be a limestone quarry.
On top of it is a flat area with a very thin layer of soil. Flat enough that we could put a bench there for anyone with time enough to sit and enjoy the view. (The house is next door.)

In the photo above, we have walked a bit beyond it and are looking back. You can see how flat the top is, and how the vein of stone runs just below the surface.
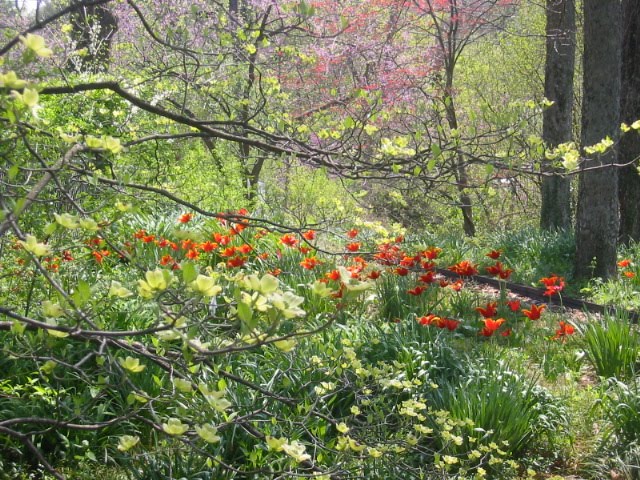
It is March.
It is March.
This is probably late April or early May. There is a puddle of white creeping phlox, and the columbines are blooming. The Gold Moss sedum was planted there by mistake and I'll never get rid of it! I meant for him to put it on the outcropping on the opposite bank. As the old saying goes: The message sent is not always the message received.

Next - A shot from farther away and probably late March or early April.

Looking down into the Rockery from the Terrace.

Because the top area is flat and has an open view out across the little dell, from day-one, I have called it “The Terrace” - and dreamed of what it could become.
 (Above) Looking from the terrace atop the Rockery into the little dell.
Then here is the helper's view back across to the Rockery.

In the early 1960's I saw a magazine article with photographs of a flagstone terrace. It was built with spaces between the flat stones. Into those spaces had been planted every kind of succulents imaginable. I was captivated. Now, it was 1990, and I still had the magazine – hoping someday to have a place to do the same.
The time and place had arrived.
By the time work began on the project, the first thing to be done was use chainsaws to remove wild sapling trees and wild shrubs. It took four or five years to finally work out all those stumps and stubs. It also took that long to complete the project from start to finish. We were working with clay.
Herbicide was sprayed to kill grass and weeds. Then it was time to work on that thin layer of soil. Using a tiller was out of the question. The tines would be broken on the stone. One of my college student helpers said, “Mrs. Crocker you know what you need?” “No, Bryan, what do I need?” “One of those Claws they advertise on television!” I had no idea what he was talking about; I watch little television.
He explained it to me, and told about using one, and how surprised he was at how well it worked. "OK... Where does one get such a tool?"
In a few days we had the tool and three young men took turns using the Claw which had to be pressed into the soil then twisted left and right, back and forth, over and over again. Building up even stronger arms and shoulders, they gradually tore up the soil and removed the dead vegetation. Then it was time to spread amendments.
I considered amendments necessary for once the stones were in and the plants installed there would be no chance in future to add anything. So, on top of the soil were added the following "ingredients": homemade compost; homemade mulch of ground-up limbs and branches; blood meal; bone meal; coarse river sand (I learned later that river sand should not have been used. I should have used the coarsest builder's sand I could find. The grains of coarse builder's sand would be more jagged and would not pack down as much as the rounded grains of river sand.); bags and bags of soil conditioner; peat; gypsum; ground limestone #11; bags of purchased manure; leaf mold (in years past we had collected fallen autumn leaves, bagged them in large plastic bags, wet them down, closed it up, then left them for a couple of years to rot into wonderful black “gold”). Then using the Claw, they were all mixed into the clay.
It was not as easy as it sounds or reads. There was rain and rain. Clay takes forevvvvvveeeerrrrrr to dry. If it is not dry enough, working with it changes the tilth and one ends up with hard rocks that will never break down. Now, I’m not complaining about having clay, because it is high in minerals making it nutritious for plants. Yes, once it is wet, it does stay wet a long time, but that provides moisture for the plants when there is a long time between rains. So, once the job is done, it is great; it just takes ages to get through the construction process.
In the beginning I was excited because I had hired a young landscape architecture student and thought this was going to be a great boon to the project. He worked one day in that clay and never came back. It appeared he didn’t want to work that hard. It was a long time before I finally found more help, and the process got under way for sure.
I have written about one of the students several times, because he was most outstanding and talented. Not only was he strong and energetic, he loved working with stone, had a pickup truck, and was (and is) very talented.
He scavenged back roads, side roads, and construction sites finding and hauling in stone he wanted to use for the project. When working with stone he seems to memorize each piece and seems to know right where it should go in the overall plan. Then he laid them out in place. ... We studied them. ... Almost nothing had to be moved, he had done a great layout with the stone. He began setting them into the loose soil. Hopefully the plants will run their roots underneath them, and hopefully, it will stay moister under there for them.
Being students, the helpers were not regularly available. There were long spells of no help while they focused on their studies (among other things). I was happy to have them working here when they were available and I could get them, after all, they do have other lives. And... there was more, and more, rain!
I recently came across the following notes to myself in my journal:
“Hens-‘n-chicks have been planted into spaces between the stones in the new, under construction succulent terrace. The very thin layer of soil there was amended with much organic material and sand and gravel. It has been a struggle what with all the rain, family events, my physical limitations, and lack of help.
Most of the assorted succulents have been set in, but the creepers like thyme are still in their little pots. The ‘terrace’ is atop a natural stone outcropping that I'm trying to make into a Rockery and mulch the whole she-bang with #11 crushed limestone topped with pea gravel.
But, the soil is almost all clay, so due to rain not allowing it to dry out, I'm not doing well with that. It's been a year since I started it. I am discouraged, but not knocked out of the fight even though I have lost a number of plants because I couldn't get them into the ground soon enough both last year and this.”
The struggle went on for a few years. Finally, the Terrace was finished, had been mulched with #11, and was waiting for its pea gravel topping. Then I (we) started on the Rockery which is the front section of the outcropping topped by the Terrace. The face is steep near the top then has a gradual slope to the bottom. And, there is deep clay.
It took forever again. Gradually, it finally came together and plants were installed. Then both the Terrace and the Rockery were given a good mulch of #11 limestone, tucking it around the plants and up under their chins. Then it was all topped off with the prettiest pea gravel I could find. Soft muted colors of gray and beige and pastels. I loved it – it was perfect – just like I’d hoped it would look – Hallelujah! happy, happy day!!! What a relief!
How many years? I lost count. How many plants? I lost count. How much money? I don’t even want to think about it. Buying the plants was spaced out over two or three years. Some died and were replaced with like-kind; some died and different kinds were added to fill in.
In the beginning I was thinking I would create a rock garden, then I read the following book. If you are contemplating creating a rock garden, I recommend reading the book Rock Garden Design and Construction published by the North American Rock Garden Society; edited by Jane McGary.
I learned: What I was making was not a true rock garden; it is a Rockery and there IS a difference. Never you mind, I like my Rockery just fine.
The following is a mishmash of snapshots from the Terrace taken different times of the year. Hope it makes some sense to you. Here's trying!
The path leading to the Terrace...
 To the right is a large Leather-leaf Viburnum in bloom. Must be late April or early May. Hiding beyond it at the end of the path is a garden bench. The crude concrete blocks surround a tiny nursery area. The blocks have since been replaced with something that looks nicer. Budget constraints would not allow everything to be done at once. Steps of the design project were spread out over several years.


,+Butterweed,+Fleabane.jpg)


in+boots.jpg)
.jpg) If anything sits still long enough around here, it gets grown over with plants, or, I fill them with plants. Husband, Best Friend, Chief Photographer says my solution to any and all problems is plants.
If anything sits still long enough around here, it gets grown over with plants, or, I fill them with plants. Husband, Best Friend, Chief Photographer says my solution to any and all problems is plants..jpg) Butter Weed coming up through the bench.
Butter Weed coming up through the bench.Immediately in front of the bench.
,+Peony+(Paeonia).jpg)
Nearby to the right hand side of the bench is an old metal rail fence that marks the property boundary on that side - approximately. In front of it grows a row of peonies.
.jpg)
Views of the terrace and close-ups of several plants. Some are quite similar...
A white blooming dianthus near the shoes.
The toe of which is seen in the lower right hand corner.
The toe of which is seen in the lower right hand corner.
.jpg)
Dianthus in bloom.
.jpg)
,+Pasque+flower+(Pulsatilla).jpg)


,+Goldmoss+(Sedum+acre).jpg)
.jpg)


.jpg)
A study in pebbles: my favorite pea gravel...


.jpg)
Pasque Flower in bloom...

And going to seed.


Epimedium (below) is one of the few good plants for dry shade. Early spring these small, dainty yellow flowers appear among last year's stems; the attractive young foliage comes on a bit later. The old foliage is supposed to be removed, but I never get it done, and the new grows through and over the old, eventually hiding it.


 The photo below shows the Epimedium's heart-shaped foliage above wiry stems.
The blue is Spanish Bluebells.

We planted a few of the little minor bulbs for spring such as this little Glory of the Snow...

and Striped Squill (Pushkinia); they are so tiny they were placed near the paths where we turn to go down to the Rockery. Here in bloom, and a tight bud can be seen in the lower right corner.
.jpg)


To get a sense of their small scale, see the two Squills near the right-hand edge and near the top right corner of this next photograph. Notice the mossy limb at the bottom of the photo.

The mossy tree limb is easier to see in the next snapshot. It has lain there at the edge of the path for years; it was there when we arrived in 1989 and is still there in 2007. It is part of an old black locust tree. Wild black locust trees (ones that have never been fed fertilizer to accelerate their growth) are very dense wood that is resistant to rotting. I try to utilize all the large fallen pieces.
(Below) Just above the plastic label are two Squills. You will understand why they were placed near the edge of the path. They wouldn't be seen otherwise. Chipmunks and wind played havoc with all the labels scattering them all over the place.

,+Pasque+flower+(Pulsatilla).jpg)

Going from the Terrace around and down to the Rockery. Ignore the steps on the left they are new and belong in another story. At the time of this story, there was only the path.
 Following are several views of the Rockery in various seasons. The conical shaped little dwarf spruce remains the focal point as we walk past.


Turning, to return to the house, we get a slightly different view as we head back up the path.


 We are back up the hill. On the right is the base of the Blue Spruce in which owls sometimes perch.
And, that is it: the closeup of the Terrace and Rockery and how they were created. They remain one of my favorite parts of the garden. They are fragile and require painstaking, careful maintenance, weeding, and grooming (including removing fallen tree leaves one at a time by hand), therefore, no one is allowed to work in them except myself and occasionally the helper who did the stone work and the setting out of most plants.
If you are interested in seeing a list of the plants go to:
Terrace & Rockery Plant List
For more about the Rockery and its conifers go to:
Stone and Conifers


4 comments:
Anything one says is bound to sound bland - but it must have been wonderful to have had such a long term project and to be able to spend such a lot of your time in the woods.
There is something that puzzles me though - have you left the little plastic labels sticking out between the stones? They don't seem to be in character with the overall 'natural' feel of everything else.
Esther
Esther and Nancy, thank you very, very much.
I would get excited at making plans and progress, then it would take a down turn, then the cycle would repeat itself. That happened a few times so was stressful on me, but after a few years it finally was completed.
Esther, I agree about the plastic labels; they did not look good. Yes, I left them that first summer, because there were so many different kinds of plants and I didn't know their names by memory. Also, if one died I wanted to know which one it was so I could try to replace it. Gradually over the months I lost that compulsion, which was just as well, because as I wrote: the wind and chipmunks strewed them all over the place so I gathered them up.
Thank you both for reading that lonnnng story. It was good for me to write it up and get it out of my system and documented so I don't have to try keeping it in my memory. My memory dims with time.
Barbee, this is so pretty. What a great design.
Love to see the plants growing on the shoes..it's very unique..
http://mygardenhome.blogspot.com
Velly
Post a Comment